results for one room challenge

Blueberry Nut Crumble

Filed Under > Desserts

blueberry nut crumbleblueberry nut crumble

Every summer when I was young my mother and I would go blueberry picking.  We’d spend an entire weekend in the Michigan sun picking buckets, and buckets of fresh blueberries.  And then when we’d come home she’d make the most perfect, yet simple fresh blueberry pie and crisp.  I’d eat it warm, I’d eat it cold, and I’d always get caught eating it right out of the dish.  I just adored it.  

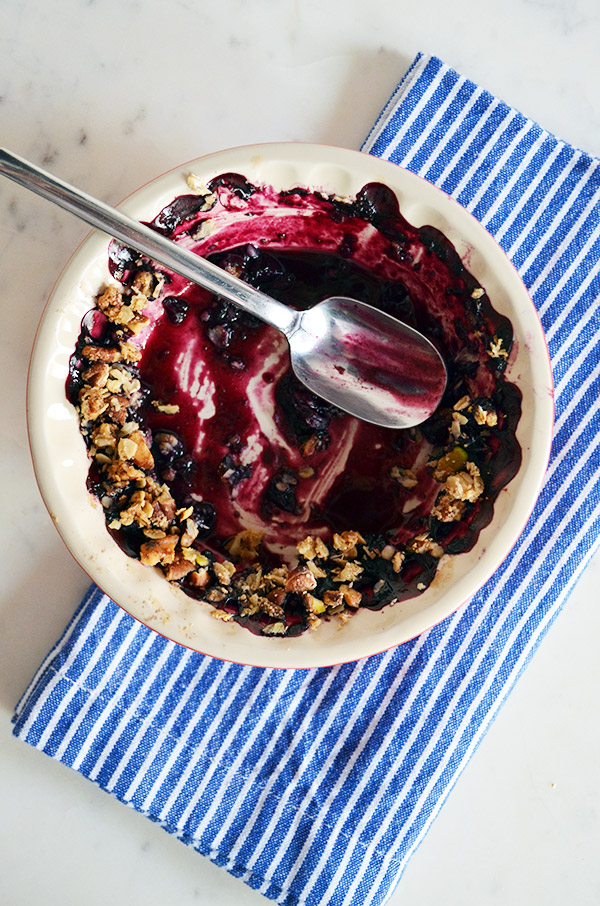
So when the weather starts to turn warm, which it is here in the South, I immediately become ready for blueberry season and my Blueberry Nut Crumble.  An easy, and I repeat easy, dessert that reminds me of my summers growing up.  Isn’t it just amazing how food seems to represent a memory, or a time in your life?  It’s one of the reasons I just love to cook…it feeds my soul.  Anyway, enjoy the crumble!  truly, MKR

all images original to Waiting On Martha

Blueberry Nut Crumble
Write a review
Print
Prep Time
15 min
Cook Time
35 min
Total Time
50 min
Prep Time
15 min
Cook Time
35 min
Total Time
50 min
Ingredients
  1. For the filling...
  2. 6 cups of fresh blueberries
  3. 1/4-1/2 cup granulated sugar depending on how sweet your blueberries are
  4. 2 tablespoons flour
  5. 2 tablespoons fresh squeezed lemon juice
  6. 1/4 teaspoon kosher salt
  7. pinch of cinnamon
  8. pinch of allspice
  9. For the crumble...
  10. 1/4 cup chopped pistachios
  11. 1/4 cup chopped almonds
  12. 1/4 cup chopped walnuts
  13. 1/4 cup chopped pecans
  14. 1/2 cup rolled oats
  15. 1/4 cup light brown sugar
  16. 1/2 cup of butter, cubed, room temperature
  17. 1/2 teaspoon vanilla
  18. 1/4 teaspoon cinnamon
  19. 1/4 teaspoon allspice
  20. Vanilla ice cream (optional)
Instructions
  1. Preheat the oven to 375°F and butter a pie plate, or in my case mini pie plates.
  2. To make the filling toss the blueberries with the sugar, flour, lemon juice, salt, and a pinch of cinnamon and allspice.
  3. Transfer the berries to the pie plate(s).
  4. For the crumble...mix together the nuts, flour, oats, brown sugar, vanilla, cinnamon, allspice, and salt.
  5. Blend in 3/4th of the butter with your fingertips until the crumble forms large clumps.
  6. Crumble topping over the pie fully covering. Place pie(s) on a cookie sheet in case the filling bubbles over.
  7. Bake until the filling begins to bubble and the crumble starts to turn golden. About 25 minutes. Take the rest of your cubed butter and place on top of crumble and continue to cook for an additional 5 minutes. Total cook time 25-35 minutes.
  8. Let cool slightly then devour. Ice cream optional.
Welcome by Waiting on Martha https://waitingonmartha.com/

This Week I…

Filed Under > Uncategorized


…survived Snow Jam Atlanta by doing THIS (Garden & Gun approves).  

…fell in major lust with THIS dress.

…watched the Budweiser super bowl commercial over and over again.  I mean my heart just melts.

…worked on that wanderlust resolution and booked a little spring skiing trip to one of our favorite places.  The mountains are calling.

…added lots of new goodies to the Shop (hello needlepoint) and welcomed Kiddos to the mix.  Plus we’re making room for all of this goodness with one last chance to take an ADDITIONAL 30% of all sale with code ONELASTCHANCE.

…discovered an amazing new marg.

…loved THIS life lessons article.  #5 was definitely an ah-ha moment.  Working on doing more of #25.  And #27 made me think again about everything that scares me.

…found my Valentine’s Day gift…cupid do you hear me?

…thought I’d bring the weekly round up back.  I’m not sure if this should be an every Friday (or Saturday) spotlight on WOM or just a occasional guest star.  What do you think…round ups each week, over the weekend, or just every now and again?  I’d love your thoughts!  TGIF Loves.  truly, MKR

Image

Chocolate Peppermint Kiss Cupcakes

Filed Under > Desserts

Chocolate Peppermint Kiss CupcakesChocolate Peppermint Kiss CupcakesChocolate Peppermint Kiss Cupcakes

Today marks the last day of my chocolate peppermint baking journey (well maybe not the last last as I’ll be sharing another recipe over on Lark and Linen’s blog soon, but it’s the last day on my blog) so why not go with a bang.  Or rather a kiss.  I give you Chocolate Peppermint Kiss Cupcakes.

By adding a simple, and oh so delicious, Hershey Candy Cane Kiss, a little peppermint extract and crushed candy cane I’ve taken the best chocolate and buttercream frosted cupcake to a whole other festive level.  And the frosting.  I can’t even talk about the frosting.  Well actually if you’ve been following me on Twitter you’d know that I’ve been eating the chocolate buttercream frosting morning, noon and night for the past few days.  Hello holiday gluttony.  Happy Monday Loves…only two more sleeps till Christmas!  truly, MKR

Chocolate Peppermint Kiss Cupcakes
Yields 24
Write a review
Print
Prep Time
20 min
Cook Time
22 min
Total Time
42 min
Prep Time
20 min
Cook Time
22 min
Total Time
42 min
Ingredients
  1. 3 cups sugar
  2. 3 cups all-purpose flour
  3. 1 1/2 cups unsweetened cocoa powder
  4. 1 tablespoon baking soda
  5. 1 1/2 teaspoons baking powder
  6. 1 1/2 teaspoons salt
  7. 1 1/2 cups buttermilk, room temperature
  8. 3/4 cup vegetable oil
  9. 3 large eggs
  10. 1 1/2 teaspoons pure vanilla extract
  11. 1/2 teaspoon peppermint extract
  12. 1 bag of Hershey Candy Cane Kisses
  13. CK Products Chocolate Buttercream Frosting
  14. crushed candy cane pieces
Instructions
  1. Preheat oven to 350 degrees.
  2. Line standard muffin pan with paper liners. Place 1 kiss in the center of each paper liner.
  3. In a large mixing bowl whisk together sugar, flour, cocoa powder, baking soda, baking powder, and salt.
  4. Add buttermilk, vegetable oil, and 1 1/2 cups warm water; whisk to combine.
  5. Add eggs, vanilla extract, and peppermint extract and whisk until smooth.
  6. Divide batter evenly among muffin cups (about 2/3 of the way full)
  7. Bake 18-22 minutes. **Normally I insert a toothpick in the center of the cupcake to check if cupcakes are done, but you don't want to hit the Hershey kiss so test by inserting just outside the center. The toothpick should come out clean with a few crumbs attached.**
  8. Transfer to wire rack and let completely cool.
  9. Frost with CK Products Chocolate Buttercream Frosting.
Notes
  1. I've tried numerous buttercream frosting recipes and brands, however CK Products Buttercream Frosting is by far the BEST I've ever tasted!
Welcome by Waiting on Martha https://waitingonmartha.com/

All images original to Waiting On Martha

Copyright © Welcome by Waiting on Martha  /
Back to Top