results for one room challenge

DIY: How to Paint Bathroom Cabinets Like a Pro

The tricks to an easy step in transforming your bathroom
In Partnership with BEHR Paint
Filed Under > Styling "How-To's" & Tips

Painting your cabinets and trim in the bathroom, #DIY @waitingonmartha
Simple steps to transform your bathroom and paint your cabinets. @waitingonmartha @behrpaint #spon #DIY
blog-interiors-behrdiy2
Transform your bathroom and #DIY paint your cabinets and trim. @waitingonmartha @behrpaint #spon

Yesterday’s reveal of my bold green bathroom makeover hopefully had you itching to dip the brush into the paint can and get started.  As you saw, paint is one of four easy and inexpensive ways to update and completely transform your bathroom.  And while I get that it can feel a bit daunting to go bold with your color choice, I hope hope you can see from yesterday’s collab with BEHR Paint that going bold with just the right color can be one of the best design decisions you make.  

While painting walls is pretty straightforward, it’s the cabinetry and doors that can get a bit tricky.  So I’ve laid out a few easy steps I take whenever I’m tackling a paint project like this.  Check them out below, and tell me, do you have any home DIY projects you’re looking to tackle?  Truly, MKR

No. 1…Remove the cabinets from the hinges, as well as all of the knobs.  This step will make your life a lot easier when you go to sand the surface (which is a must-do). Skipping this step will give you a headache later, so it’s definitely worth your while. Be careful to keep track of all hardware as you do so, as you’ll need it to restore the cabinet doors to their hinges. 

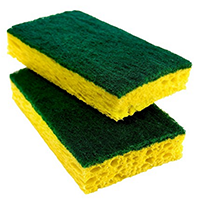
No. 2…Sand the entire area of the cabinet doors.  You’ll want to do this in order to sand down the edges and smooth out the entire surface for the new paint. Don’t go crazy with the sanding, just an easy smoothing of the surfaces will do.

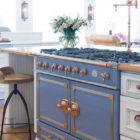
No. 3…Start painting.  Generally, I use at least two coats of paint for cabinetry.  Cabinets and doors tend to chip easier than the rest of the room simply because the amount of natural use they get so wear and tear will show quickly.  I’ve found that two coats of paint cover the surface well, and I always keep a can of touch-up paint on hand for when nicks do happen.  And when painting with bold colors, I paint them all by hand.  You’ll really want to take your time with the blue painter’s tape to appropriately line the edges (check out this great blue painter’s tape how-to, or get your most OCD friend to help you here).  By focusing on perfection on this step, you’re less likely to run into any mess-ups you’ll have to fix later.  And one major tip I have for mess ups is to simply keep a small bucket with cold water next to me as I paint by hand.  Being able to act fast using cold water and either paper towels for small spots or a hand towels for larger areas allows you to fix any oops moments.  

No. 4…Place cabinet doors back onto their hinges and secure. After the paint has completely dried (please do not rush the drying process), remove the blue painter’s tape and secure your cabinetry back in its place. 

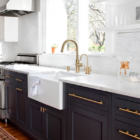
No. 5…Add statement making knobs to finish the look. Lastly, place your updated selection of knobs, or as I consider it jewelry, on the newly painted cabinets. I scored some stunning hardware, which compliments the paint color to perfection. 

Photography, Rustic White for Waiting on Martha | This post is in collaboration with BEHR Paint, a brand we love and adore.  All opinions are 100% our own. 

Skillet Caramel Pecan Cinnamon Rolls & Coffee with Dunkin Donuts

A Caramel Pecan Glaze Creates an Irresistible Base for Ooey Gooey Cinnamon Rolls
In Partnership with Dunkin' At Home
Filed Under > Breakfast & Brunch

Skillet pecan cinnamon rolls via @waitingonmartha @dunkinathome #spon #recipewomblogs10_5_16_rusticwhite_005 blog-pecancinnamonrolls Dunkin' At Home bakery series coffee is SO good. @waitingonmartha @dunkindonuts #spon #coffee Skillet pecan cinnamon rolls recipe via @waitingonmartha @dunkindonuts #spon #cinnamonrolls #coffee

Life is pretty insane right now.  But in all of the hustle and bustle, in all of the “busy”, in all of the late nights, there’s one thing that always keeps me going: my quiet “me time” mornings.  Now those mornings don’t often mean more than 20 minutes, but that’s 20 minutes of time that is all mine.  It’s 20 minutes where I don’t question where my phone is, whose email I need to respond to, what shop customer I need to help, or what time I need to meet my photographer.  It’s 20 minutes where the only concern I have is if the coffee has begun brewing, and what chapter I left off on the morning before.  And it’s 20 minutes I’ve come to depend on to get me through the day ahead.  In short, it’s my ritual.

If I’m being completely truthful, a huge part of that ritual is the coffee itself.  Each morning I stumble downstairs, half asleep, and make a bee line to my coffee maker.  Like clockwork, I flip the switch (my kind, kind husbands preps the coffee the night before), grab a mug and sit there with anticipation while the coffee percolates down into the glass pot.  The aroma fills the air, and waves of heat billow out of my mug, and for a moment all is right with the world…I have coffee, lots and lots of coffee.

And with the colder weather finally here, lately I’ve been getting up a bit earlier to steal a few more of those “me time” minutes.  Starting my day, of course, with a cup of ‘jo and recently a little homemade treat that makes the coffee just a bit more cozy.  So it was pretty perfect timing when Dunkin’ At Home invited me to try their Bakery Series® coffee.

With flavors like Cinnamon Coffee Roll, Chocolate Glazed Donut and Caramel Coffee Cake I didn’t think twice before saying yes.  Especially since I’ve been a fan of Dunkin’ Donuts® coffee for years (DD got me through many a long night in college and law school).  It’s been a little over a week since I’ve added the Bakery Series® to my morning line-up, and I’ve got to say perfect and cozy doesn’t even begin to sum up my love for these new coffees.  I love them so much in fact, my latest morning obsession was inspired by them: Skillet Caramel Pecan Cinnamon Rolls.  And friends, let me tell you these pecan cinnamon rolls will be reason enough to get up on those crisp, chilly mornings this fall.  The rolls pair perfectly, of course, with DD’s Cinnamon Coffee Roll coffee plus they only take about 15 minutes of prep time, which is perfect for me because I don’t remember a time when I’ve had enough time to make cinnamon rolls from scratch on a weekdaymorning!  Ha!  Find the full recipe below, and tell me, do you have a morning ritual?  Truly, MKR

P.S. Keep your eye out for Dunkin’ At Home’s Bakery Series® coffee on your next grocery run.  I’d love to hear which flavor you plan to pick up!  xo

Skillet Pecan Cinnamon Rolls with Homemade Caramel Sauce
Write a review
Print
Prep Time
15 min
Cook Time
30 min
Total Time
16 min
Prep Time
15 min
Cook Time
30 min
Total Time
16 min
Ingredients
  1. Whole pecans, enough to layer bottom of your skillet (varies by size of skillet)
  2. caramel sauce*
  3. cinnamon rolls***
For the caramel sauce
  1. 4 sticks unsalted butter, room temperature
  2. 2 cups brown sugar
  3. 1 cup light corn syrup (I always use Karo brand)
  4. 1 teaspoon salt
  5. 1 teaspoon baking soda
  6. 2 teaspoons pure vanilla extract
Instructions
  1. Preheat your oven to 350 degrees.
  2. Layer the bottom of your cast iron with pecans.
  3. Make the homemade caramel sauce: Add brown sugar, corn syrup, butter and salt in a heavy 2-quart saucepan. Stirring constantly, bring to a boil over medium heat. Boil 2 minutes without stirring. Remove from heat. Stir in baking soda and vanilla; mix well.
  4. Pour the caramel sauce over the pecans in the skillet to create a gooey base.
  5. Arrange cinnamon rolls** on top of the caramel pecan base.
  6. Bake the cinnamon rolls uncovered in skillet for 30 minutes, or until golden brown.
  7. Let cool for up to 30 minutes.
  8. Ice the cinnamon rolls with your icing.
  9. When serving, scoop each cinnamon roll with the gooey base of caramel pecans. Enjoy!
Notes
  1. *You can substitute the homemade caramel sauce for store-bought if you prefer.
  2. ***When I'm strapped for time, I skip the homemade cinnamon rolls and use the big organic kind that's pre-made from Whole Foods.
  3. If you do have enough time and opt for homemade cinnamon rolls, here's a good recipe I like to use from AllRecipes.com: http://allrecipes.com/recipe/241917/quick-cinnamon-rolls/.
Welcome by Waiting on Martha https://waitingonmartha.com/

Photography, Rustic White for Waiting on Martha  |  This post is in collaboration with Dunkin’ At Home, a brand we love and adore.  All opinions are 100% our own. 

6 Everyday Life Hacks We All Need to Know

Simple Fixes & Tricks to Bookmark Now
Filed Under > Life Skills

If you’re like me, you panic every time a glass of red wine spills.  You google (or text your mother) how to keep your brass clean.  You curse up a storm when you try to self-clean the oven and the smoke detector goes off instead. 

The answers are always pretty simple enough, but they’re the kind of things that are easy to forget.  That’s why we rounded up six great everyday life hacks that solve some of our most common headaches.  Spills, stains and annoying chores are now made easy!  Tell me, do you have any tricks or life hacks to add to the list?  Cheers, Kat

P.S. If this life hacks post puts you in the organizing spirit, check out how to organize your linen closet, how to organize your master bathroom and how to organize your laundry room.  xo

SHOP THE STORY / CLICK LEFT & RIGHT ARROWS TO EXPLORE
 

Get clothing wrinkles out in a pinch

Get clothing wrinkles out in a pinch

I’ve heard people say putting your clothes in the shower while it’s steaming can help get wrinkles out (I’ve tried it; doesn’t work every time). BUT a trick that does work: put a damp washcloth or paper towel in the dryer with your wrinkled item. In 5-10 minutes, you’ll be wrinkle-free! If you’re too lazy to iron or pressed for time, you’ll enjoy these other lazy ways to remove wrinkles.

SHOP THE LOOK:


VIA WAITING ON MARTHA
Learn how to fold a fitted sheet

Learn how to fold a fitted sheet

Master the art of folding a fitted sheet once and for all. This simple video shows us that it’s all about the half-fold and tucked corners!

SHOP THE LOOK:


VIA WAITING ON MARTHA
Clean your stove the right way

Clean your stove the right way

Contrary to logic, you should NEVER use the self-clean function to clean out your stove. Instead, a little baking soda, vinegar and elbow grease will help get your stove looking spick and span. You’ll want to make a baking soda and water paste, which then will be left in the oven overnight to coat the grease spots. After it’s sat overnight, you’ll wipe out the oven with a damp cloth and spray a little vinegar for any remaining baking soda residue. A final wipedown will have your oven looking beautiful once more! For more info, check out The Kitchn’s step-by-step tutorial.

SHOP THE LOOK:


VIA DÉCOR PAD
Make a red wine stain disappear

Make a red wine stain disappear

I’m the person that completely panics when a red wine spill happens. I’ve recently learned that the key is to blot, NEVER RUB, and a generous amount of salt and boiling water will help make it disappear. The longer you wait to clean it up, the more likely it is to set. For more info, check out this list of home remedy options to try. And as a side note, my friend recently spilled red wine on a white dress and our DIY Thieves household cleaner got it right out too.

SHOP THE LOOK:


VIA WAITING ON MARTHA
Remove germs from your sponges

Remove germs from your sponges

Microwaving a smelly sponge is one of the easiest ways to clean and deodorize it. Thanks to Reader’s Digest, we now know about this little life hack. First, pour a small amount of lemon juice into a bowl of water. Then, soak the sponge before putting it in the microwave on high for one minute.

SHOP THE LOOK:


VIA HOUZZ, BY ELIZABETH LAWSON DESIGN
Make your metals shine again

Make your metals shine again

Vintage brass objects are such fun finds to pick up while you’re antiquing, but they can be absolutely filthy and covered in tarnish. Luckily, it’s pretty simple to get the tarnish off with a mixture of lemon, baking soda and water. One of our favorites Emily Henderson shares a great tutorial here.

SHOP THE LOOK:


VIA WAITING ON MARTHA

Featured image, Kathryn McCrary for Waiting on Martha

Copyright © Welcome by Waiting on Martha  /
Back to Top