results for one room challenge 2016

Funfetti Cake & Welcome To The New Waiting On Martha

Filed Under > Desserts

Homemade funfetti cake with chocolate icingFunfetti mini cakes Funfetti cake with chocolate icing

Don’t you just love starting the week of with a good surprise?!  Well surprise!  It has been a long five months of anticipation, and a true labor of love, but I couldn’t be more thrilled to welcome you to the new Waiting On Martha.

So what’s new?  Besides the obvious look and feel, we’ve worked for months adding new enhancements and features, all to make the reader experience easier and more intuitive.  For example, along with the classic way you’ve always read our stories, you’ll notice links to view full galleries.  By clicking on this box, you’ll be taken to a new page where you can view, Pin and share additional images from that day’s story.  We found we had too many great photos that weren’t making the cut and our photographers work too hard to not have their work shared.  We’ve also added a slideshow feature as an easier way to read through specific posts.  When you see view slideshow, all you’ll need to do is click and scroll right or left.

Along the top navigation bar, you’ll find two new features; Shop Our Instagram and Shop Our Stories.  We were getting an insane amount of emails asking us about where to find specific items either from our stories or our Instagram, so we’ve rounded it all up in one convenient place for you.  Speaking of convenience, our new “contact us” form makes it a breeze to get in touch with myself or my team.  Simply type in what you’re hoping to chat about; collaboration, e-design, social media consulting, etc.,  and send away.

Lastly, because we have so much more to say, we’ll be moving to sharing stories seven days a week.  And you’ll not only be hearing from me, but also from Kat, our Editor and Social Media Director, and our Creative Partners.  What is a Creative Partner?  Creative Partners are some beyond-talented individuals WOM taps on a monthly basis to help us out with a project or share a project they’re working on.  You can read more about them on our new team page, (bios and more CP’s will be added soon, so stay tuned).

While this is all beyond exciting, (we’ve been working on this since October), it is all very new.  I ask that you bear with us as we work within our new platform, I’m sure there will be a few kinks to work out, Rome wasn’t built in a day!

Big thanks to everyone who worked tirelessly to make this happen; Designer Cassie Pyle, Coder Brandi Bernoskie, and our very own Kat Neunaber.  I couldn’t have made this dream a reality without you.  So welcome to the new Waiting On Martha, now excuse me while I dive into this funfetti cake and pop some bubbly!  Truly, MKR

P.S.  As if this wasn’t amazing enough we also have a new portfolio site to share, Mandy Kellogg Rye, and next week The Shop will be re-launching as well.  Ch-ch-changes!

SHOP THE STORY / CLICK LEFT & RIGHT ARROWS TO EXPLORE


Funfetti Cake with Butter Cream Frosting
Yields 10
Write a review
Print
Ingredients
  1. ...For the Cake
  2. 1 cup milk
  3. 1 1/2 teaspoons vanilla extract
  4. 1 cup butter, room temperature
  5. 2 cups sugar
  6. 3 cups cake flour
  7. 1 tablespoon baking powder
  8. 5 egg whites
  9. Rainbow Jimmies (ie. sprinkles)
  10. Chocolate sauce (optional)
  11. ...For the Frosting
  12. 1 cup butter, softened
  13. 1/4 teaspoon salt
  14. 1 (32-oz.) package powdered sugar
  15. 7 Tbsp. milk
  16. 1 tablespoon vanilla extract
  17. Rainbow Jimmies (ie. sprinkles)
Instructions
  1. ...For the cake
  2. Preheat oven to 350°. Liberally grease 3 (8-inch) round cake pans.
  3. In a small mixing bowl stir together milk and vanilla.
  4. In a large electric mixing bowl beat room temperature butter at medium speed until creamy; gradually add sugar, beating until light and fluffy.
  5. In a separate mixing bowl sift together flour and baking powder; add to butter mixture alternately with milk mixture, beginning and ending with flour mixture.
  6. At a low speed slowly add in desired amount of jimmies and mix just until blended.
  7. just until blended.
  8. Beat or whisk egg whites until stiff peaks form; gently fold into batter. Pour batter into prepared pans.
  9. Bake at 350° for 20 to 23 minutes or until a wooden pick inserted in center comes out clean. Cool in pans on wire racks 10 minutes. Remove from pans to wire racks and let rest until completely cool.
  10. ...For the frosting
  11. Beat butter and salt at medium speed with an electric mixer until creamy.
  12. Gradually add powdered sugar alternately with 7 Tbsp. milk, beating at low speed until blended and smooth after each addition.
  13. Stir in vanilla and desired amount of Jimmies, beat until frosting reaches preferred consistency. *When frosting layered, tall, cakes I prefer my frosting on the lighter side to not weigh down the cake.
  14. When completely cooled cut off tops of cakes to create a completely even, flat surface. Spread Vanilla Buttercream Frosting between layers (about 3/4 cup per layer) and on top and sides of cake.
  15. Top with chocolate sauce (optional).
Notes
  1. To achieve a messy frosting look take a small spatula or butter knife and gently press down circling the entire cake creating "rings."
Adapted from Ms. Billetts White Cake
Welcome by Waiting on Martha https://waitingonmartha.com/

Photography, Kathryn McCrary

How To: Growing An Indoor Herb Garden

Filed Under > How To

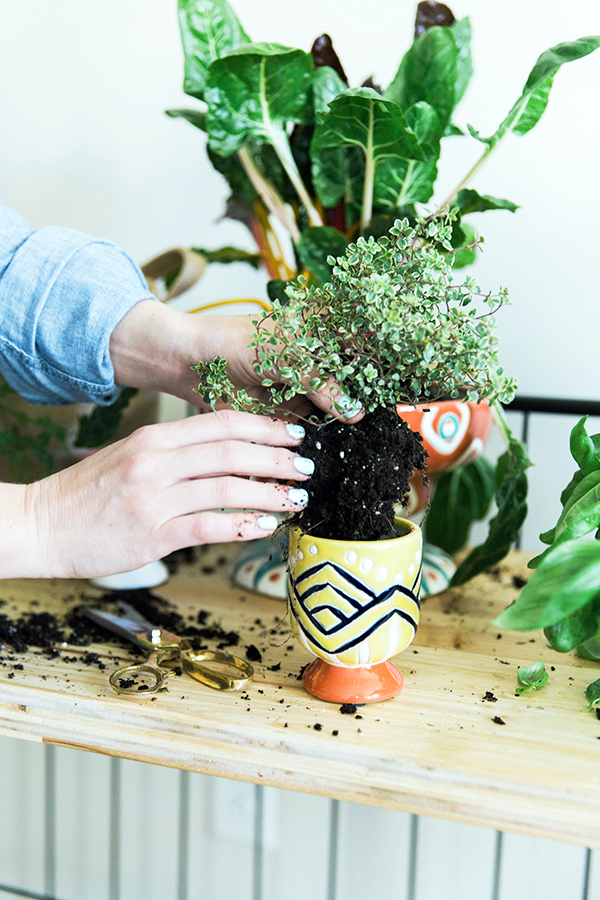
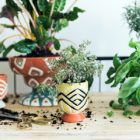
Growing an indoor herb gardenGrowing an indoor herb gardenGrowing an indoor herb gardenGrowing an indoor herb garden Growing an indoor herb garden  

There’s nothing I love more than infusing fresh herbs from my kitchen herb garden into whatever I’m cooking or cocktailing.  And whether you consider yourself an expert or novice gardener, mastering a small indoor herb garden is easier than you think.  

To get started, gather planters of different shapes and sizes (these are from Anthropologie), organic potting soil and your preferred seeds or already-planted herbs. When selecting your preferred herbs, think of how you’ll use them.  Sprigs of thyme add a crisp bite to everything from roasted vegetables to hearty soups.  Fresh cut basil is the perfect way to garnish a salad, and a necessity for any margherita pizza.  Parsley garnishes every dish with a much-needed pop of color.  Mint is a mojito staple and will make your entire kitchen smell heavenly.  And if you find yourself regularly cooking with one herb more than others, plant that herb in one of the larger planters and double up on seeds.  

When moving the herbs from the store containers to your planters, gently break up the roots with your fingers and place the herbs in the center of your planter. Then, surround the plant with additional soil. Lightly pat down the soil, but make sure not to overcrowd the herbs or add too much soil—you want to always give the plant room to grow. (See the slideshow below for an easy four-step tutorial.)

Each herb will vary slightly when it comes to water and sunlight. Make sure to read the directions accompanying each plant. For example, herbs like basil, need more sunlight and water than rosemary, which will flourish even when being neglected.  I’d also suggest investing in a plant mister for the herbs, and keep in mind that as the herbs begin to outgrow their original planters, you can easily replant them outside where they’ll have more room to flourish, or split the herb to keep one portion inside to have on hand, and the other remaining outside.

Your edible herb garden, filled with sage, rosemary, and other fragrant herbs, will be a much-loved addition to your kitchen.  Do you plant and use herbs regularly?  Truly, MKR

SHOP THE STORY / CLICK LEFT & RIGHT ARROWS TO EXPLORE 


STEP 1: LOOSEN THE ROOTS

STEP 1: LOOSEN THE ROOTS

WHEN MOVING THE HERBS FROM THE STORE CONTAINERS TO YOUR PLANTERS, GENTLY BREAK UP THE ROOTS WITH YOUR FINGERS AND PLACE THE HERBS IN THE CENTER OF YOUR PLANTER.

PHOTOGRAPHY, KATHRYN MCCRARY
STEP 2: ADD ADDITIONAL SOIL

STEP 2: ADD ADDITIONAL SOIL

SURROUND THE PLANT WITH ADDITIONAL SOIL, BUT MAKE SURE NOT TO OVERCROWD THE HERBS OR ADD TOO MUCH SOIL—YOU WANT TO ALWAYS GIVE THE PLANT ROOM TO GROW.

PHOTOGRAPHY, KATHRYN MCCRARY
STEP 3: PAT DOWN & WATER

STEP 3: PAT DOWN & WATER

LIGHTLY PAT DOWN THE ADDITIONAL SOIL AND WATER.

PHOTOGRAPHY, KATHRYN MCCRARY
STEP 4: FOLLOW THE DIRECTION

STEP 4: FOLLOW THE DIRECTION

PER THE HERB'S DIRECTIONS, PLACE THE HERB WHERE IT WILL GET THE APPROPRIATE AMOUNT OF SUNLIGHT.

PHOTOGRAPHY, KATHRYN MCCRARY

Photography, Kathryn McCrary  |  This story is in collaboration with Caldrea and the Caldrea Gardens.  Opinions and images are 100% our own.

Instagram Week In Review

Filed Under > Uncategorized

It’s been a crazy week filled with packing and prepping our Atlanta move, countless goodbyes and goodbye dinners, and of course jetting off to NYC for a little vacation before the Martha Stewart Dreamer’s Into Doers event.  Here are a few quick pics courtesy of Instagram and I can’t wait to see what next week holds in NYC, Mississippi and Atlanta!  xoxo


Top to bottom, left to right…Kate Spade “Live Colorfully” Laptop Case | Waiting On Martha Turquoise Horn Necklace (Coming Soon) | Waiting On Martha Turquoise Spike Necklace (Coming Soon) | Headed out to The Pump Room (Pants J.Crew “Minnie” Red, Shirt Zara Similar Here, Faux Fur Vest Michael Kors Similar Here, Shoes Christian Louboutin Similar Here) | Lights at The Pump Room |  Addison’s new puppy cut with St. Patty’s Day bows | Cadbury Eggs my favorite! | In flight on our way to NYC, Hermes Avalon Blanket | Tory Burch Lapis Bib Necklace On Sale NOW! | NYC | Headed to The Waverly Inn (Necklace Waiting On Martha (Coming Soon), Jacket Zara, Camisole J.Crew, Pants J.Crew “Minnie” Red, Shoes Alexander Wang Whipstitched Ankle Boots | Shake Shack…yum | Waiting On Martha Turquoise Cocktail Ring (Coming Soon) | Celine Luggage Tote I literally had to fight 3 women for | Champagne in the Bathroom at Beauty & Essex

Copyright © Welcome by Waiting on Martha  /
Back to Top